Tutorials & Guides
Learn LeadNudge
Step-by-step guides to get set up, manage your pipeline, and close the loop between your CRM and your ad campaigns.
Start here
Getting started in 5 steps
Most teams are fully live within a day. Here's the exact order that works best.
Accept your invitation
You'll receive an invitation email from info@leadnudge.ae. Click the link, set your password, and you're in. Your workspace is already configured with pipeline stages and settings by your admin.
Connect your Meta Facebook Page
Go to Settings → Meta Lead Ads. Click "Connect with Facebook" and authorise LeadNudge to access your Facebook Pages. Select the page your lead ads run from. From that moment, every lead form submission lands directly in your pipeline — no manual exports, no Zapier.
Configure your pipeline stages
Go to Settings → Pipeline. Your stages come pre-loaded from your onboarding discussion. Rename, reorder, or add new stages to match your actual sales process. Each stage can have a Meta event and Google conversion action mapped to it.
Invite your team
Go to Agents and click "Invite Member". Enter the agent's email, full name, role (Agent, Manager, or Admin), and commission %. They receive an invitation email and can log in immediately. There is no separate onboarding step.
Enable Meta CAPI
Go to Settings → Meta CAPI. Enter your Pixel ID (found in Meta Events Manager) and your CAPI Access Token (found in Events Manager → Settings). Select your dataset type — Website Pixel or CRM Dataset. LeadNudge will then automatically fire conversion events to Meta whenever a lead moves to a qualifying pipeline stage.
Feature guides
Everything you can do with LeadNudge
Deep-dives into each feature — what it does, where to find it, and tips for getting the most out of it.
Meta Lead Ingestion
Connect your Facebook Page once and all lead ad form submissions flow into your pipeline automatically. LeadNudge uses a page-level Meta webhook — not form-level — so every current and future lead form on your connected Page is covered without additional setup.
- Connect at Settings → Meta Lead Ads → "Connect with Facebook"
- Leads arrive in your first pipeline stage instantly — no polling, no delay
- Duplicate leads (same phone or email within 7 days) are flagged, not silently dropped
- Custom fields from your Meta lead form appear in the Form Responses section of the lead detail
- Use "Sync Historical Leads" on the Meta Lead Ads settings page to import past submissions
- If the connection breaks, re-authorise from Settings → Meta Lead Ads
Pipeline & Kanban Board
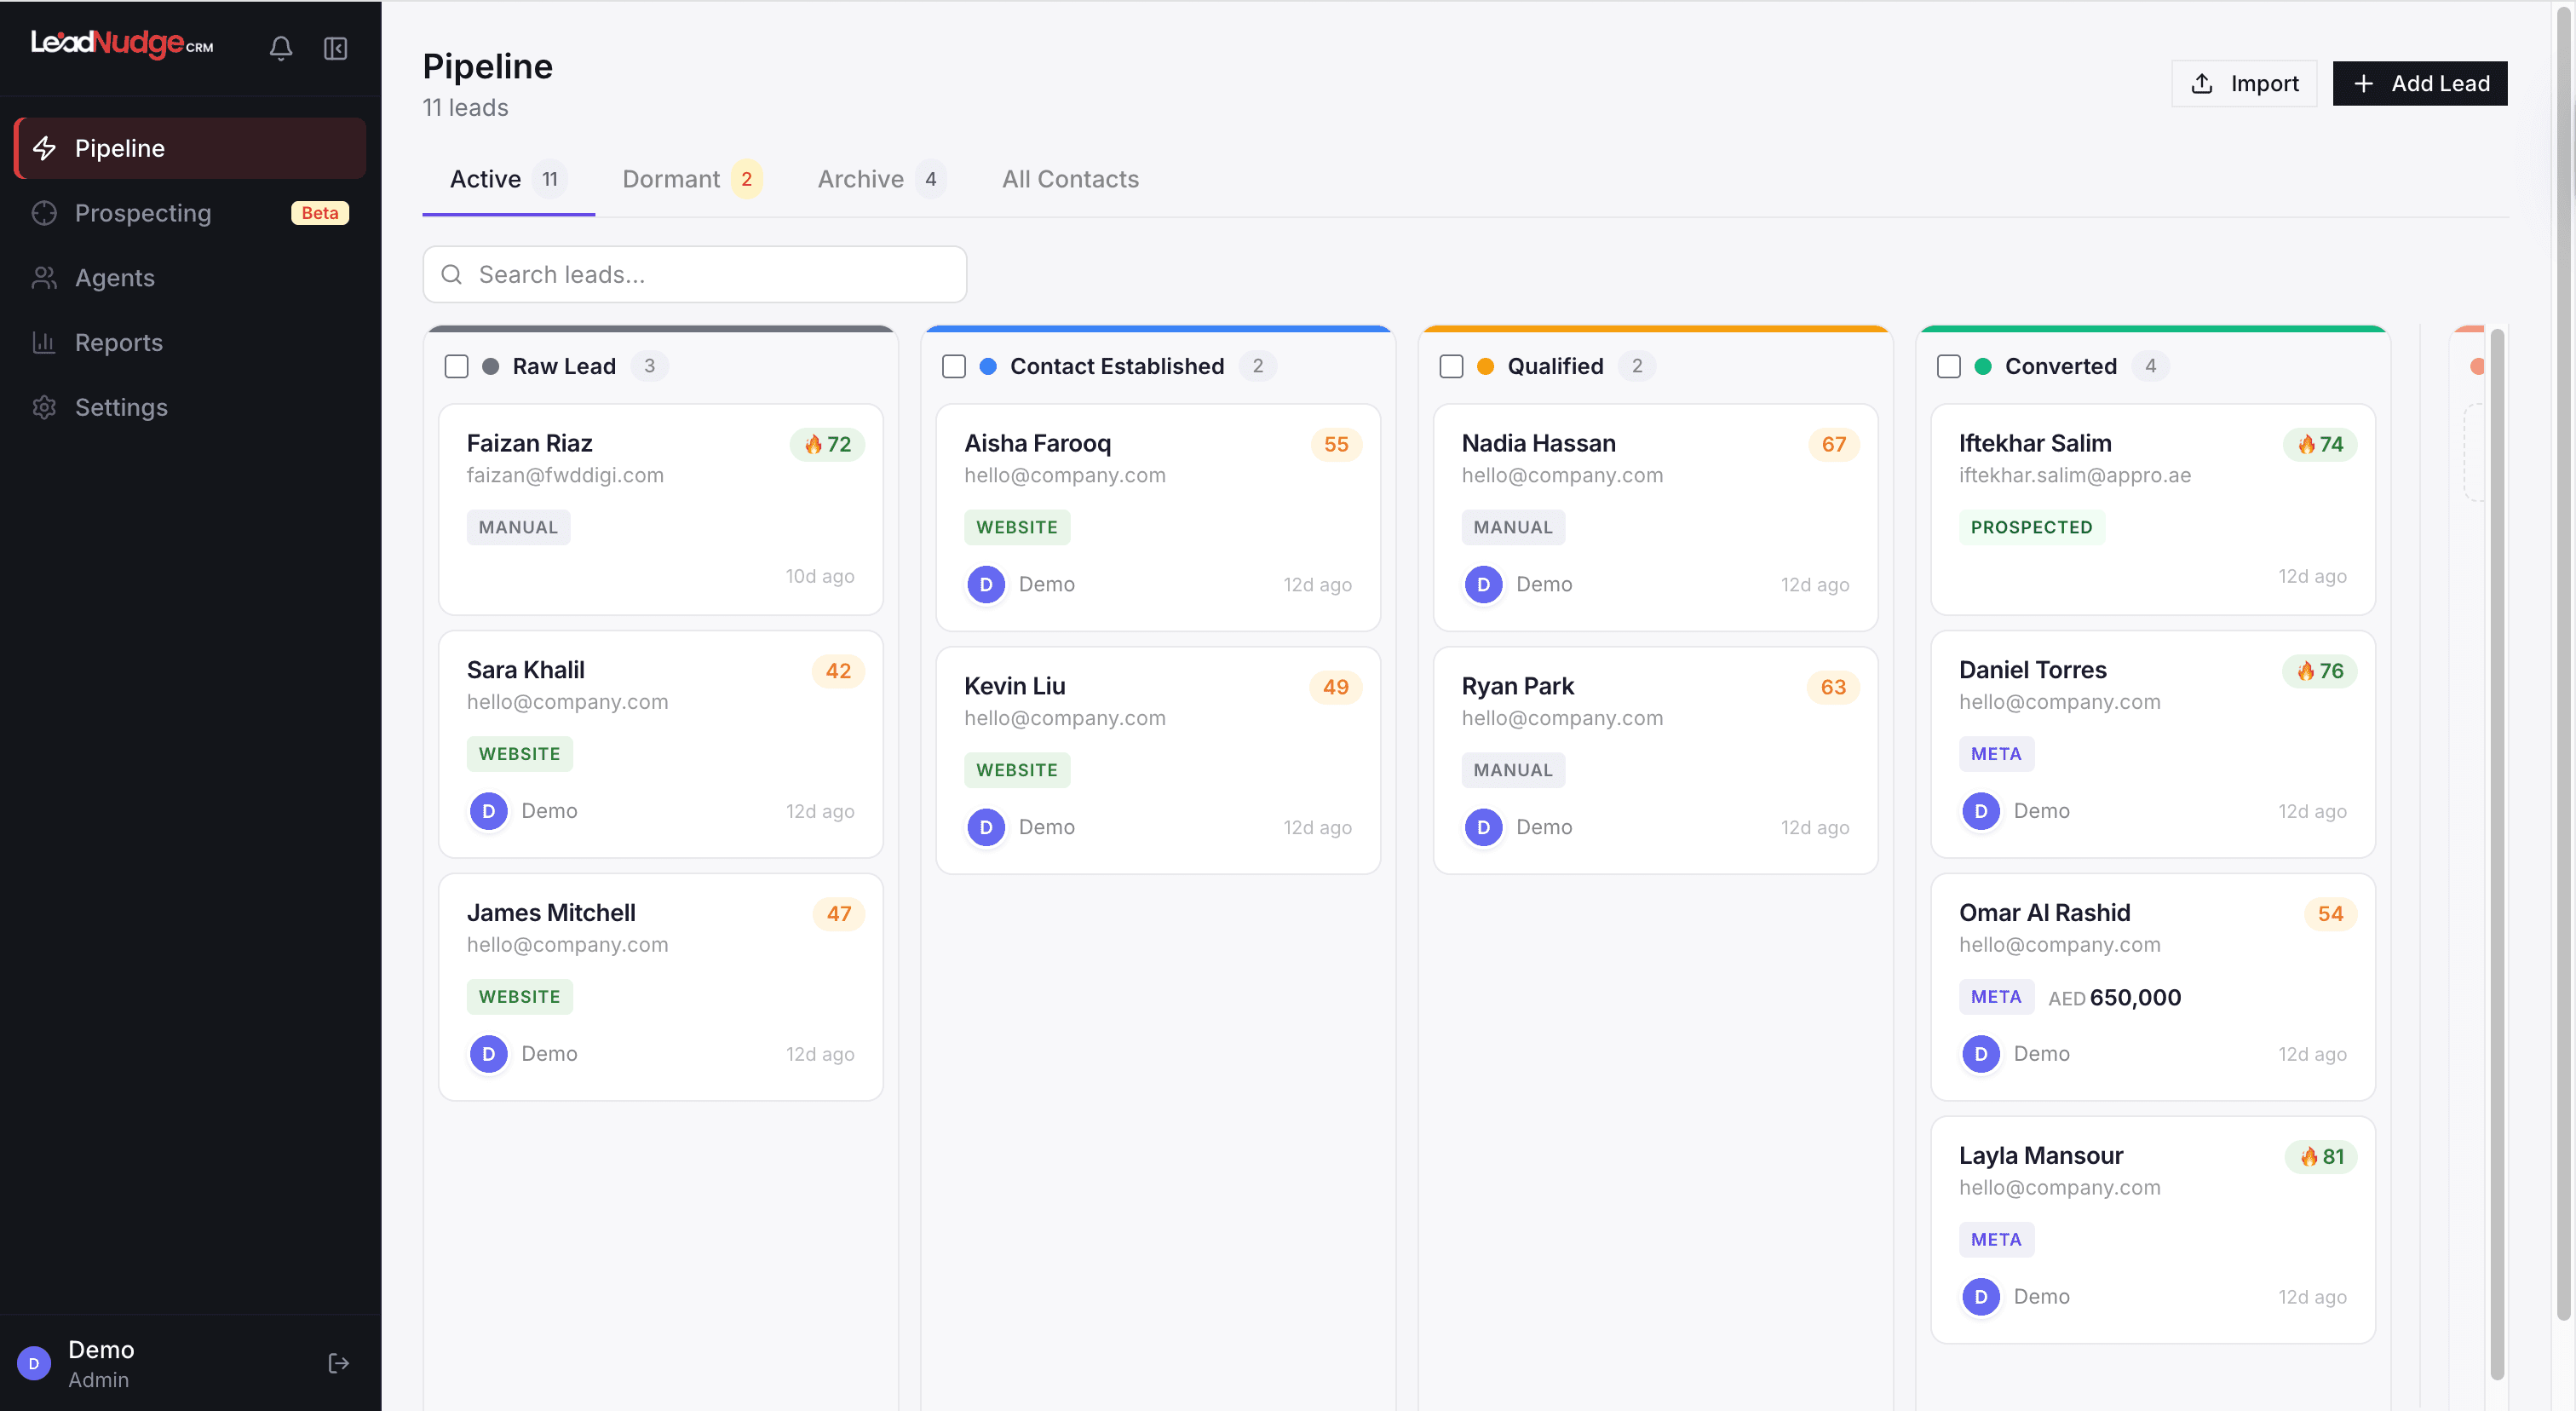
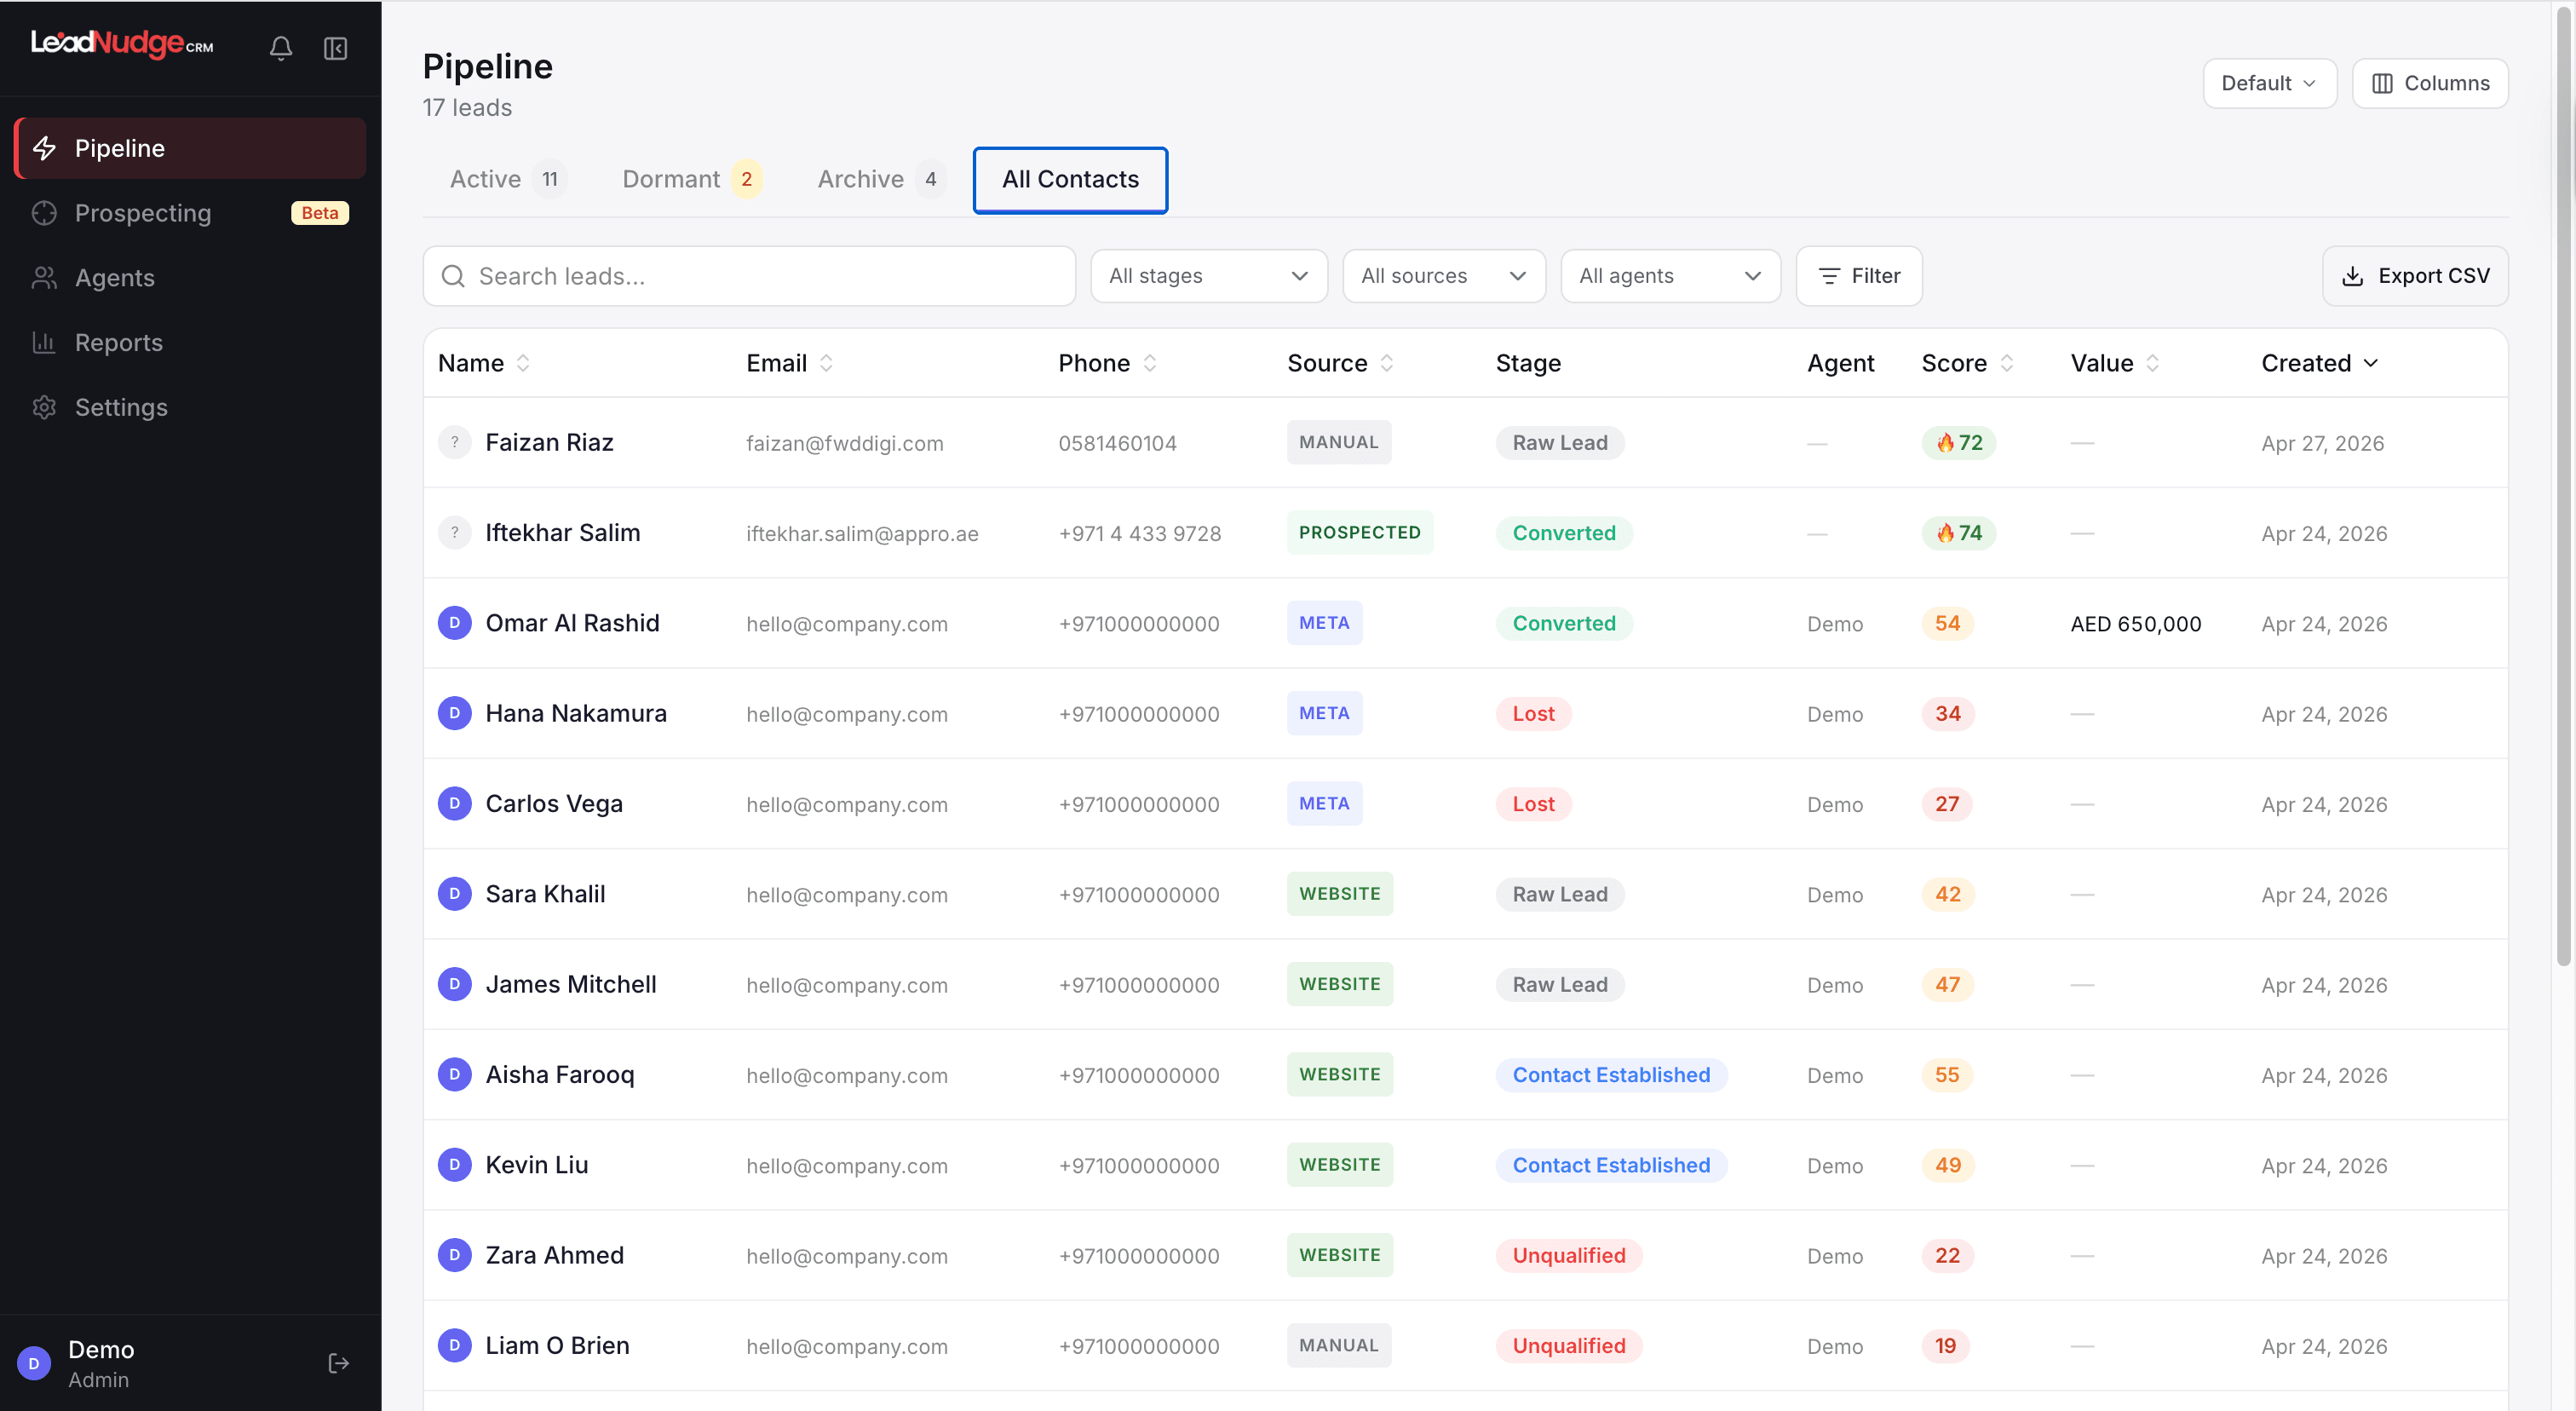
The Pipeline page (/leads) is your main working view. Leads are organised as cards in columns matching your pipeline stages. Drag a card to a new column to move the lead. The board has four tabs: Active, Dormant, Archive, and All Contacts.
- Active tab shows the live Kanban board — drag cards between columns to move leads
- Dormant tab shows leads that have been inactive past your configured threshold (Settings → Pipeline)
- Archive tab holds leads that were dormant too long — you can re-engage them from there
- All Contacts tab is a full data table with a column picker and saved views
- Each card shows the lead's name, score badge, source chip, assigned agent avatar, and time in stage
- Filter the board by agent, stage, or source using the toolbar at the top
Lead Detail
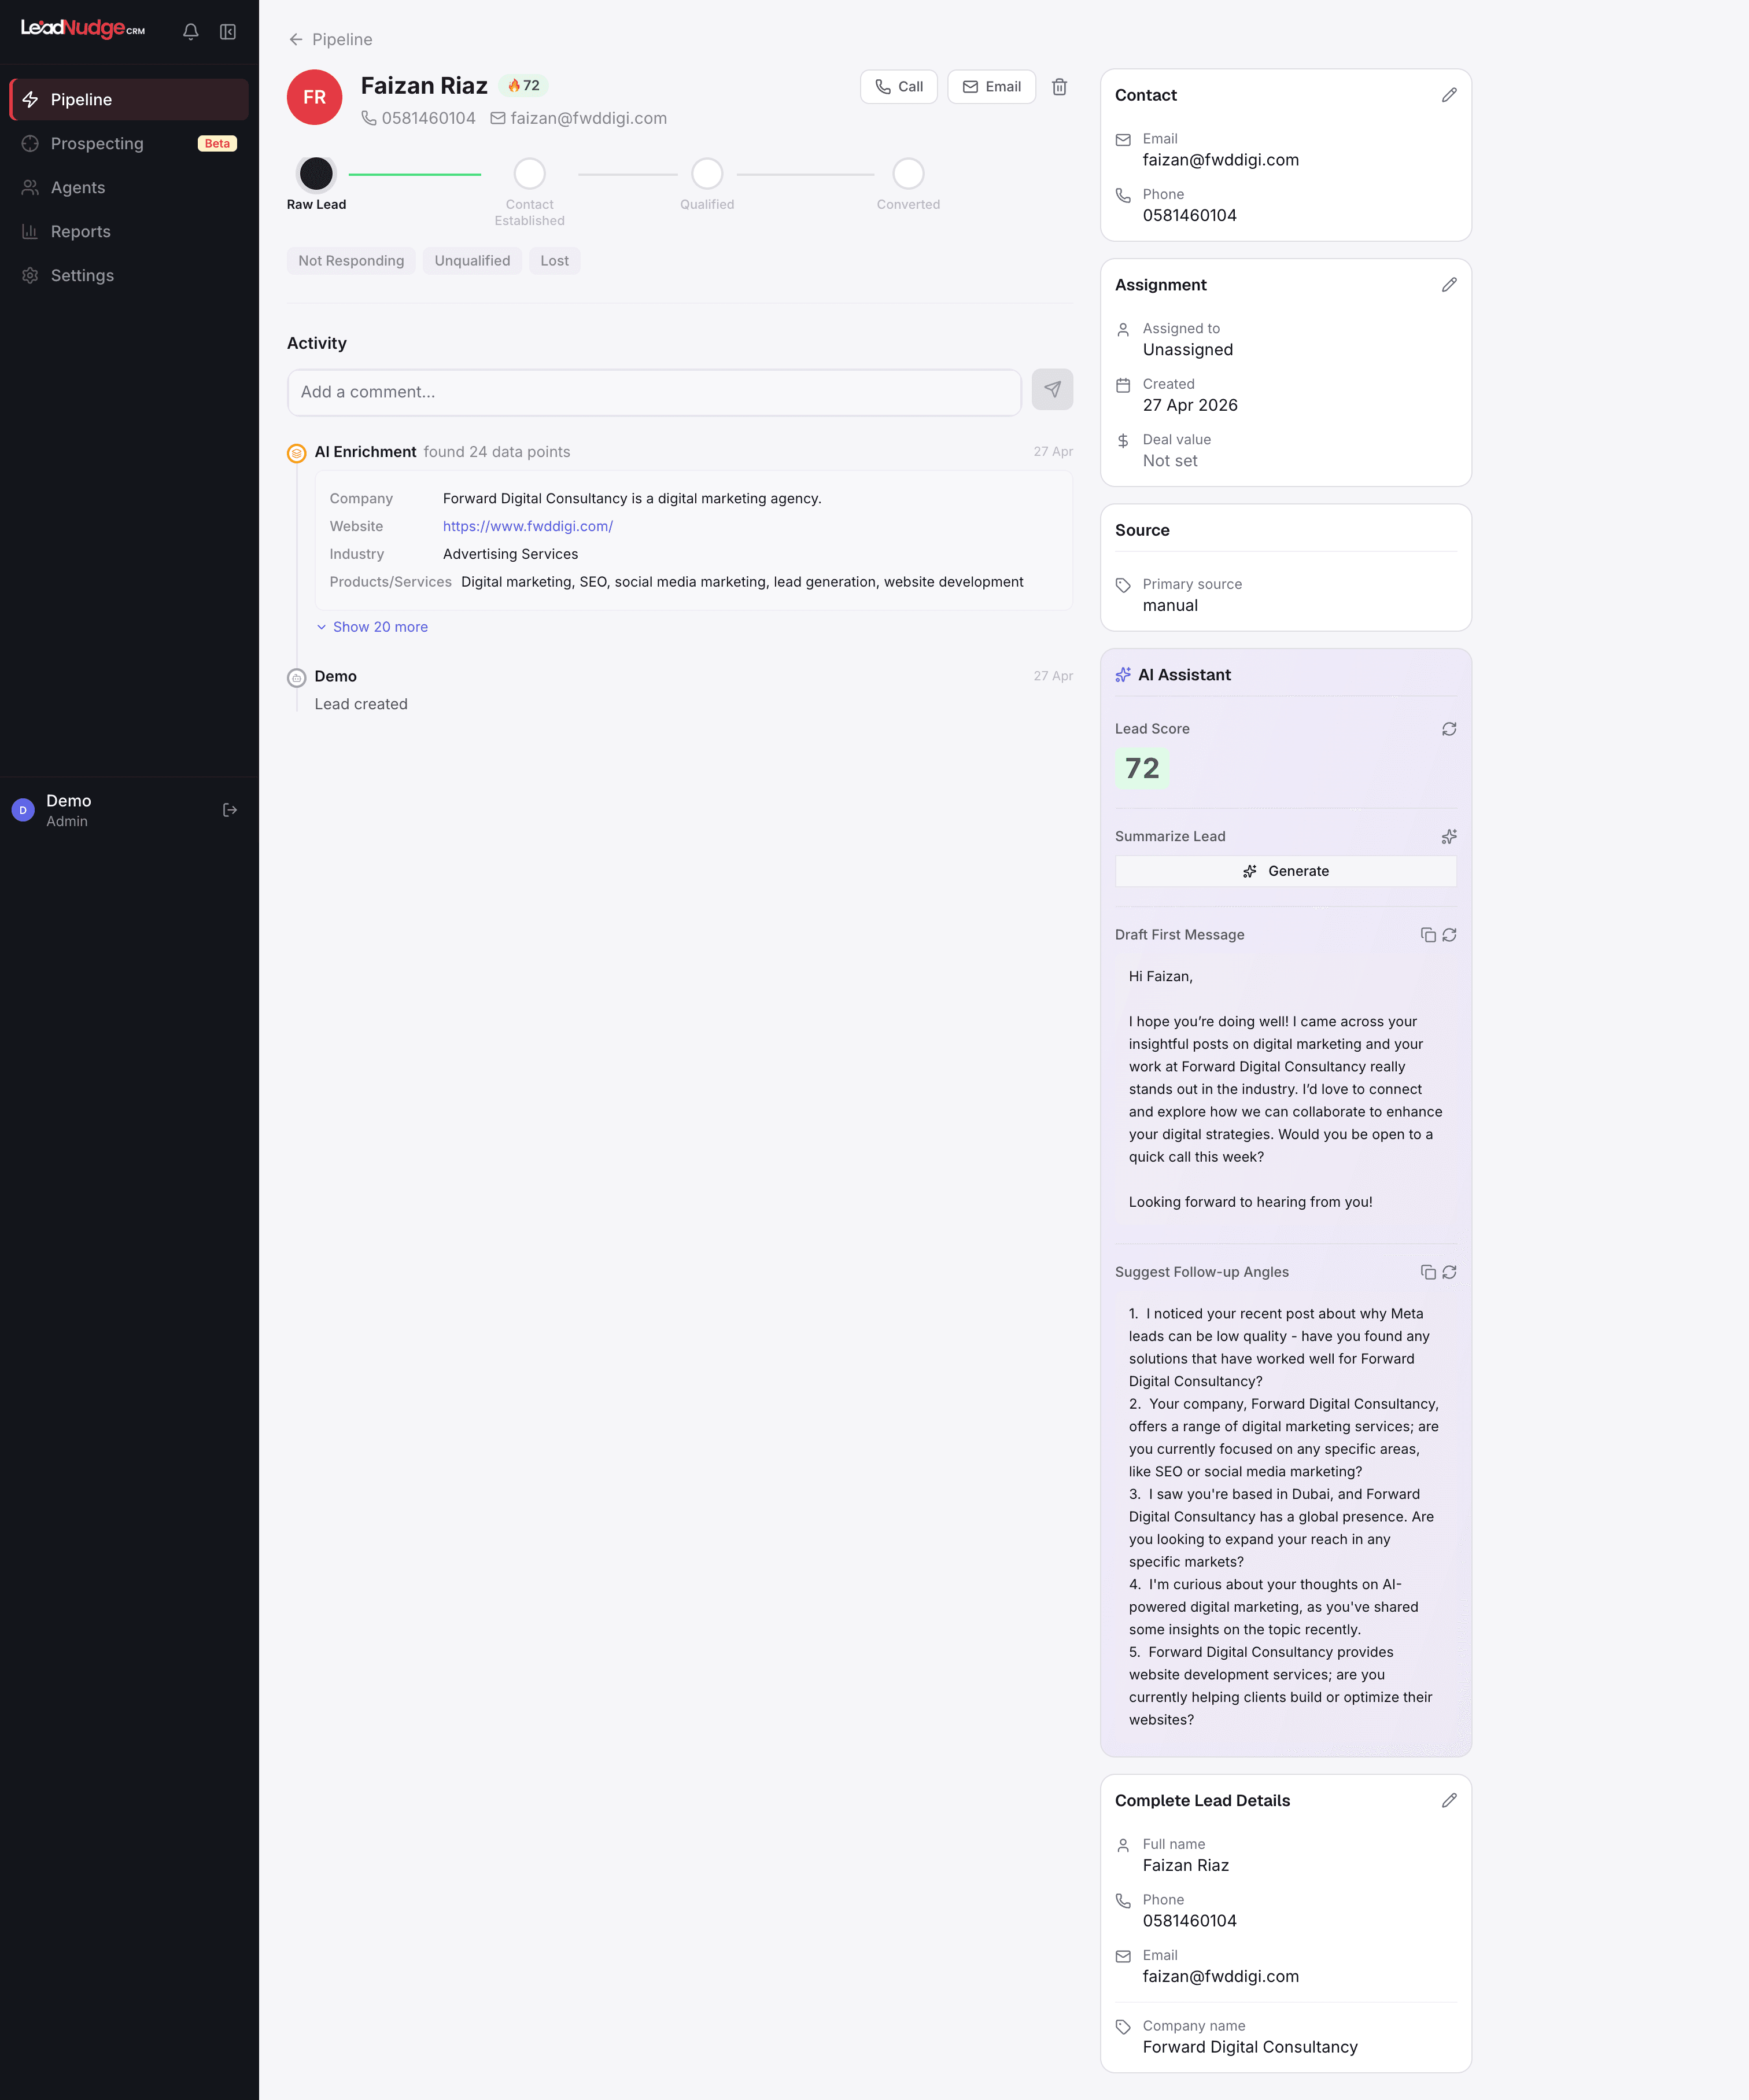
Click any lead card to open the full detail view. The page has a horizontal pipeline stepper at the top — click any stage to move the lead there. The right sidebar shows Contact, Assignment, Source, AI Assistant, Form Responses, and Complete Lead Details sections.
- Click a stage in the pipeline stepper to move the lead — this triggers CAPI events if the stage is configured
- Contact section: view and edit email and phone inline
- Assignment section: reassign the lead, edit deal value, and see created/last contact dates
- Source section: shows the campaign, ad name, UTM parameters, Meta Lead ID, and GCLID
- Form Responses section: raw fields from the Meta or website lead form, values are editable
- Activity log below the stepper tracks every stage change, note, field edit, and AI action with timestamps
AI Features
All AI features live in the AI Assistant section of the lead detail sidebar. There are four tools: Lead Score, Generate Summary, Generate Draft, and Generate Followup. Each is generated on demand — click the button and copy the result.
- Lead Score: generates a 0–100 score with a reason. Green ≥ 70, yellow ≥ 40, red < 40. Rescoring is available if the lead data changes
- Generate Summary: an AI-written executive summary based on the lead's source, campaign, stage, deal value, and contact history
- Generate Draft: a sales message draft tailored to the lead's context — ready to paste into WhatsApp or email
- Generate Followup: a follow-up suggestion for leads that have gone quiet
- All outputs have a "Copy" button — none are sent automatically, your team reviews before sending
- Re-score or regenerate at any time using the refresh icon next to each tool
Meta CAPI (Conversions API)
LeadNudge fires conversion events to Meta's Conversions API using your own Pixel ID and access token — not a shared pixel. Events are sent with hashed PII per Meta's requirements. Configure at Settings → Meta CAPI.
- Fields required: Pixel ID and CAPI Access Token (from Meta Events Manager → Settings)
- Dataset Type: choose "Website Pixel" if you have a Meta pixel on your site, or "CRM Dataset" for CRM-only tracking
- Test Event Code (optional): enter a test code from Meta Events Manager to verify events during setup
- Events fire automatically when a lead moves to a stage with a Meta event mapped (configured in Settings → Pipeline)
- Default events: marketingqualifiedlead for MQL stages, salesqualifiedlead for SQL stages, Purchase for Customer/Converted stages
- Verify fired events in Meta Events Manager → Test Events
Google Offline Conversions
LeadNudge uploads conversion data to Google Ads when leads reach a qualifying pipeline stage. This closes the loop between your Google campaigns and actual revenue. Configure at Settings → Google Ads.
- Click "Connect with Google" to authorise LeadNudge via OAuth
- Enter your Google Ads Customer ID (format: 123-456-7890, found top-right in Google Ads)
- Pipeline stages marked as "converted" in Settings → Pipeline automatically send offline conversions to Google
- Google uses this data to optimise Smart Bidding toward leads that actually close
- Conversions are attributed to the original Google Ad click via the GCLID captured on lead ingestion
Notifications
The bell icon sits in the top-right corner of the sidebar. A red badge shows your unread count (shown as "9+" above nine). Clicking opens the notification panel. Clicking any notification navigates to the associated lead and marks the notification as read.
- All notifications auto-mark as read 1.5 seconds after you open the panel
- Use the "Clear read" button to dismiss read notifications from the panel
- Notifications are triggered by: new lead assigned to you, SLA breach, stage change by a colleague, and system events
- Managers receive notifications for their team's SLA breaches
- SLA thresholds per stage are configured in Settings → Pipeline
Agents & Team Management
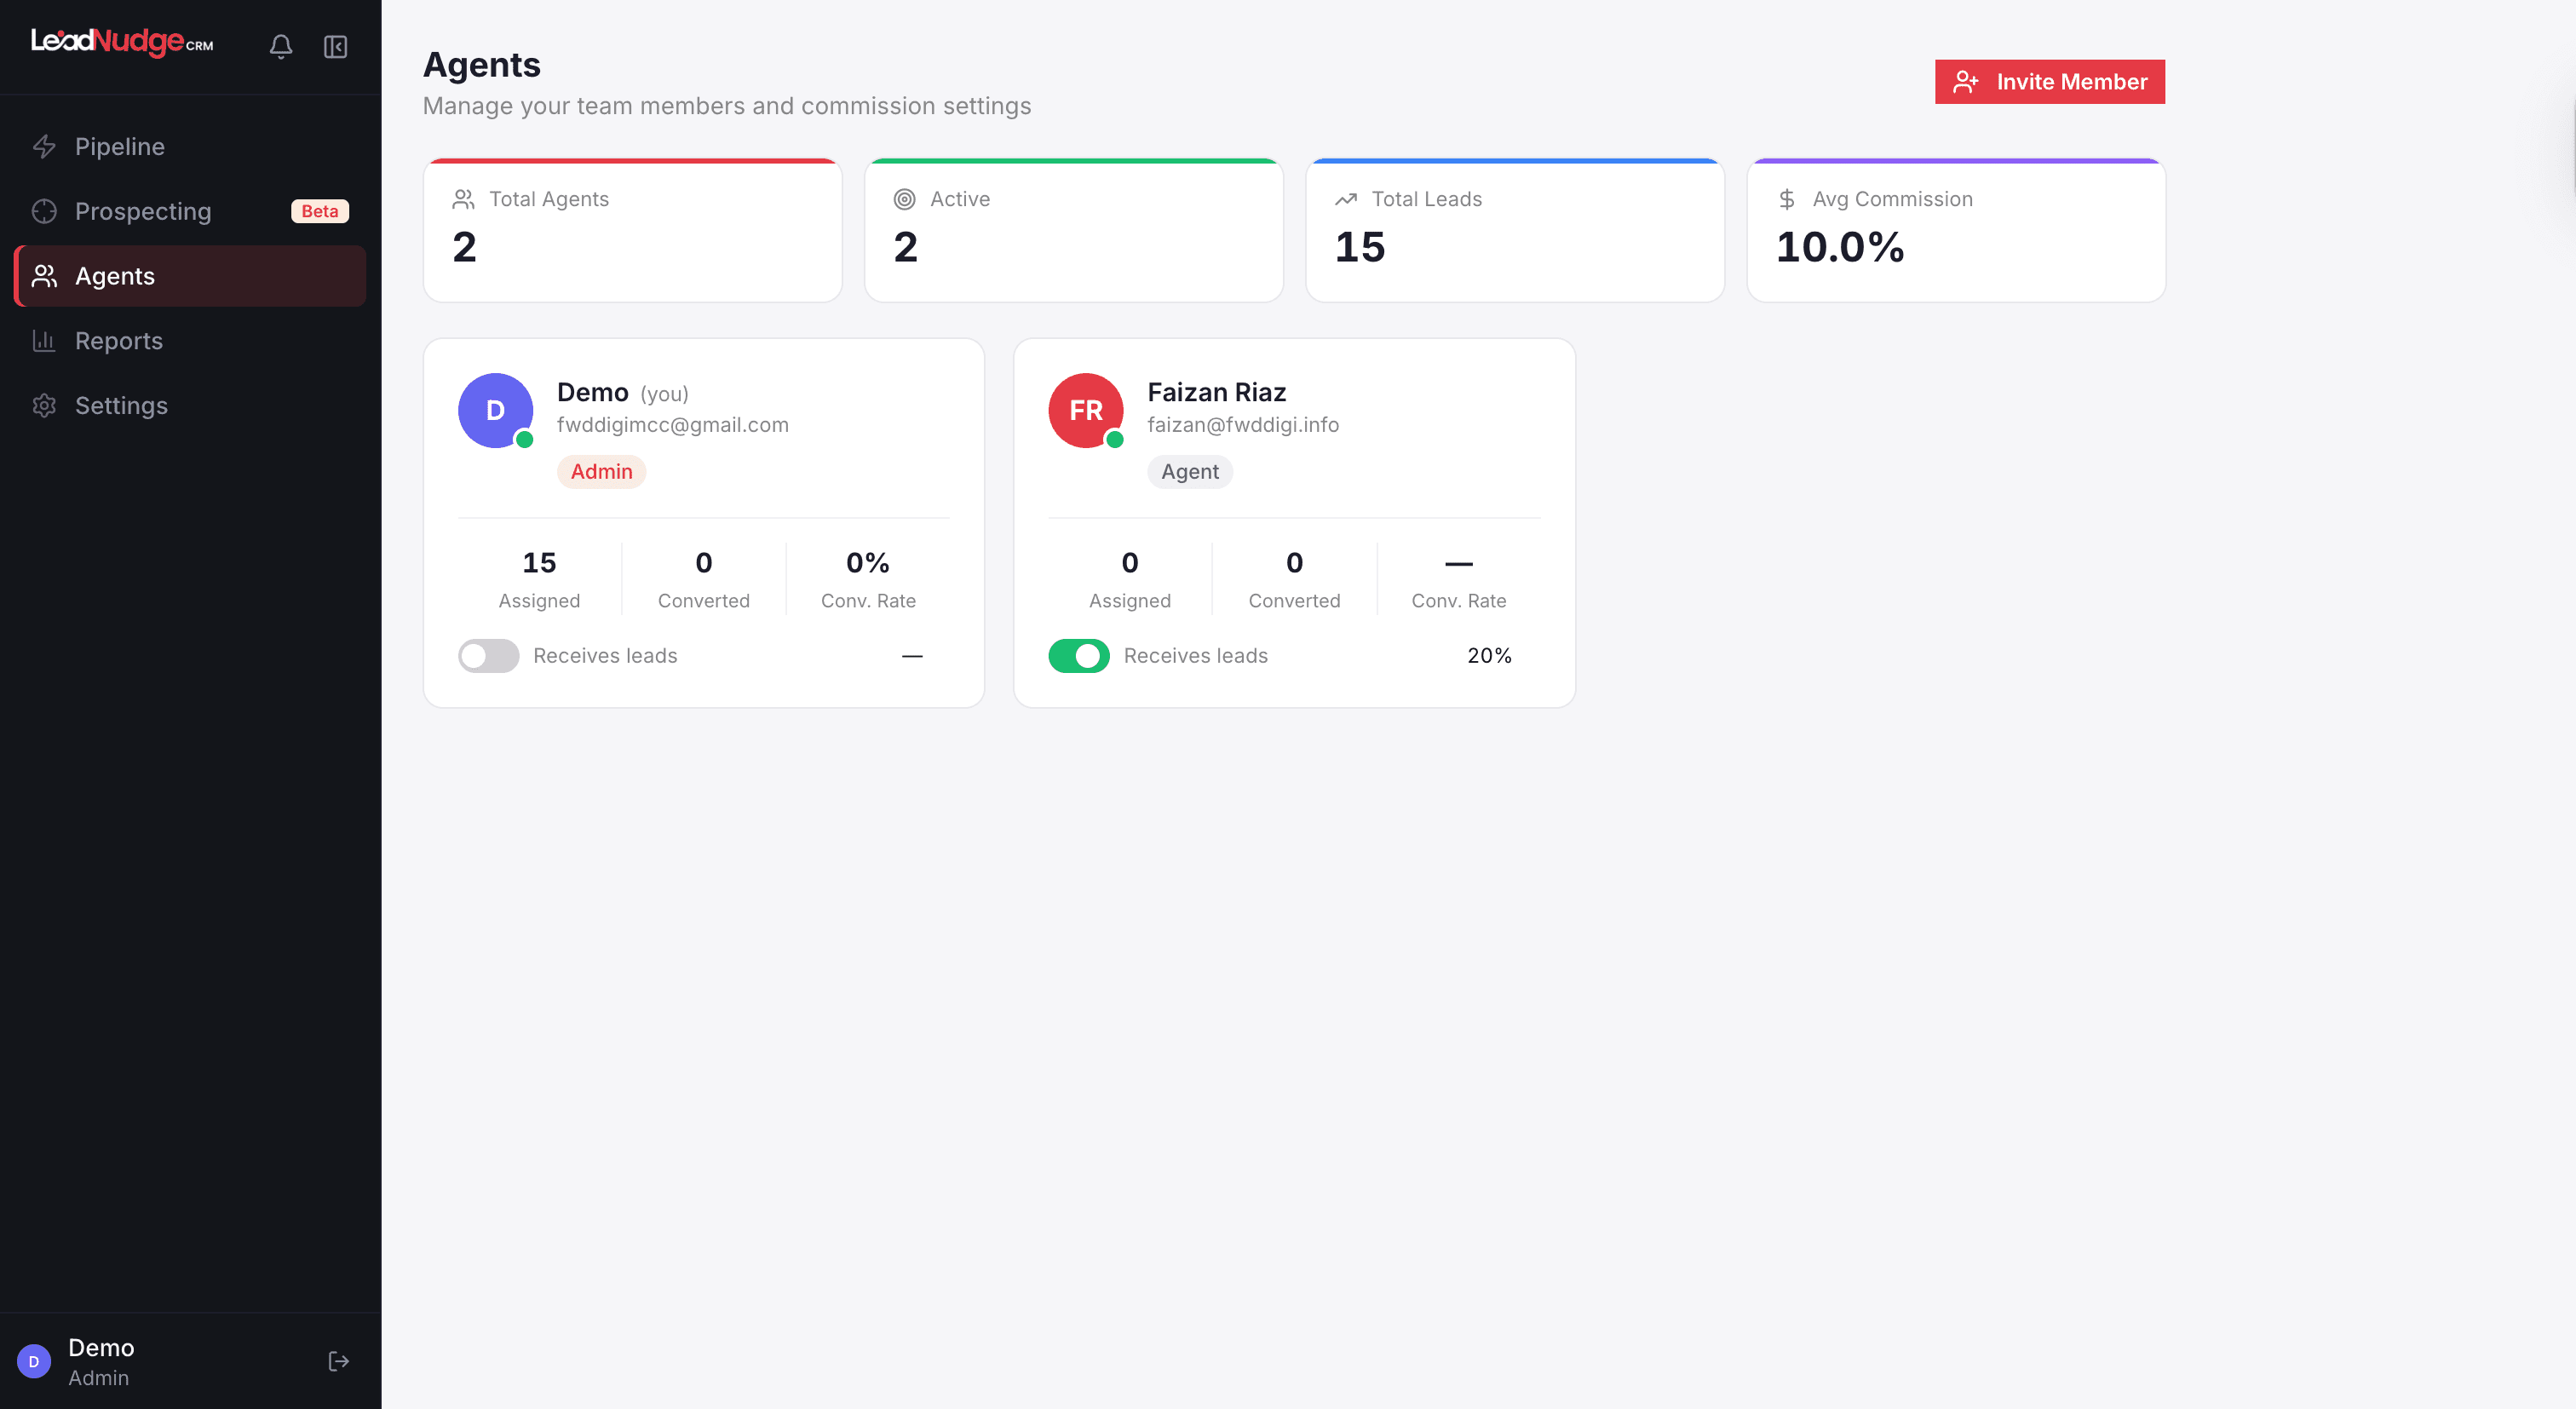
Team management lives on the Agents page (/agents) — not in Settings. Click "Invite Member" to add someone. The page shows all team members as cards with their stats, role, commission rate, and lead counts.
- Click "Invite Member" — enter email, full name, role, and commission %
- Roles: Agent (sees only assigned leads), Manager (sees all leads + reports), Admin (full access including Settings)
- Each agent card shows: Assigned leads, Converted leads, Conversion rate, and Commission %
- Toggle "Receives leads" to include or exclude an agent from automatic lead assignment
- Edit an agent's name, email, phone, or role using the pencil icon (admin only)
- Removing an agent unassigns their leads — leads stay in the pipeline and can be reassigned

Reports & Analytics
The Reports page (/reports) gives managers a full view of pipeline health, team performance, and ad spend. Use the date filter (24h, 7d, 30d, or custom range) to scope the data.
- KPI cards: Total Leads, New Leads, Converted Leads, and Conversion Rate for the selected period
- Charts: Leads Over Time, Leads by Source, Ad Spend Over Time, Spend by Campaign, Leads by Stage, Google Ads Spend
- Agent Performance table: leads worked, contacted, converted, and commission earned per agent
- Campaign Performance table: spend, cost per lead (CPL), and lead volume per Meta campaign
- AI Insights section: auto-generated bullet-point summary of the period's performance
- Ad spend data requires your Meta ad account to be connected (Settings → Meta Lead Ads)
Prospecting
The Prospecting page (/prospecting) is a Beta AI feature for finding new leads outside of your Meta campaigns. It has two tabs: ICP (define your target audience) and Contacts (view and action the results).
- ICP tab: create a template with target job titles, industries, locations, country, and company size range
- Once an ICP is saved, LeadNudge runs a prospecting job to find matching contacts
- Contacts tab: review prospected contacts with columns for name, title, company, email, phone, LinkedIn, and confidence score
- From the Contacts tab you can: push contacts into your pipeline, assign to an agent, verify emails in bulk, or export as CSV
- A quota bar shows how many contacts you've used against your plan limit
- Filter contacts by ICP template, prospect status (unassigned / assigned / in pipeline), and email verification status
Settings Overview
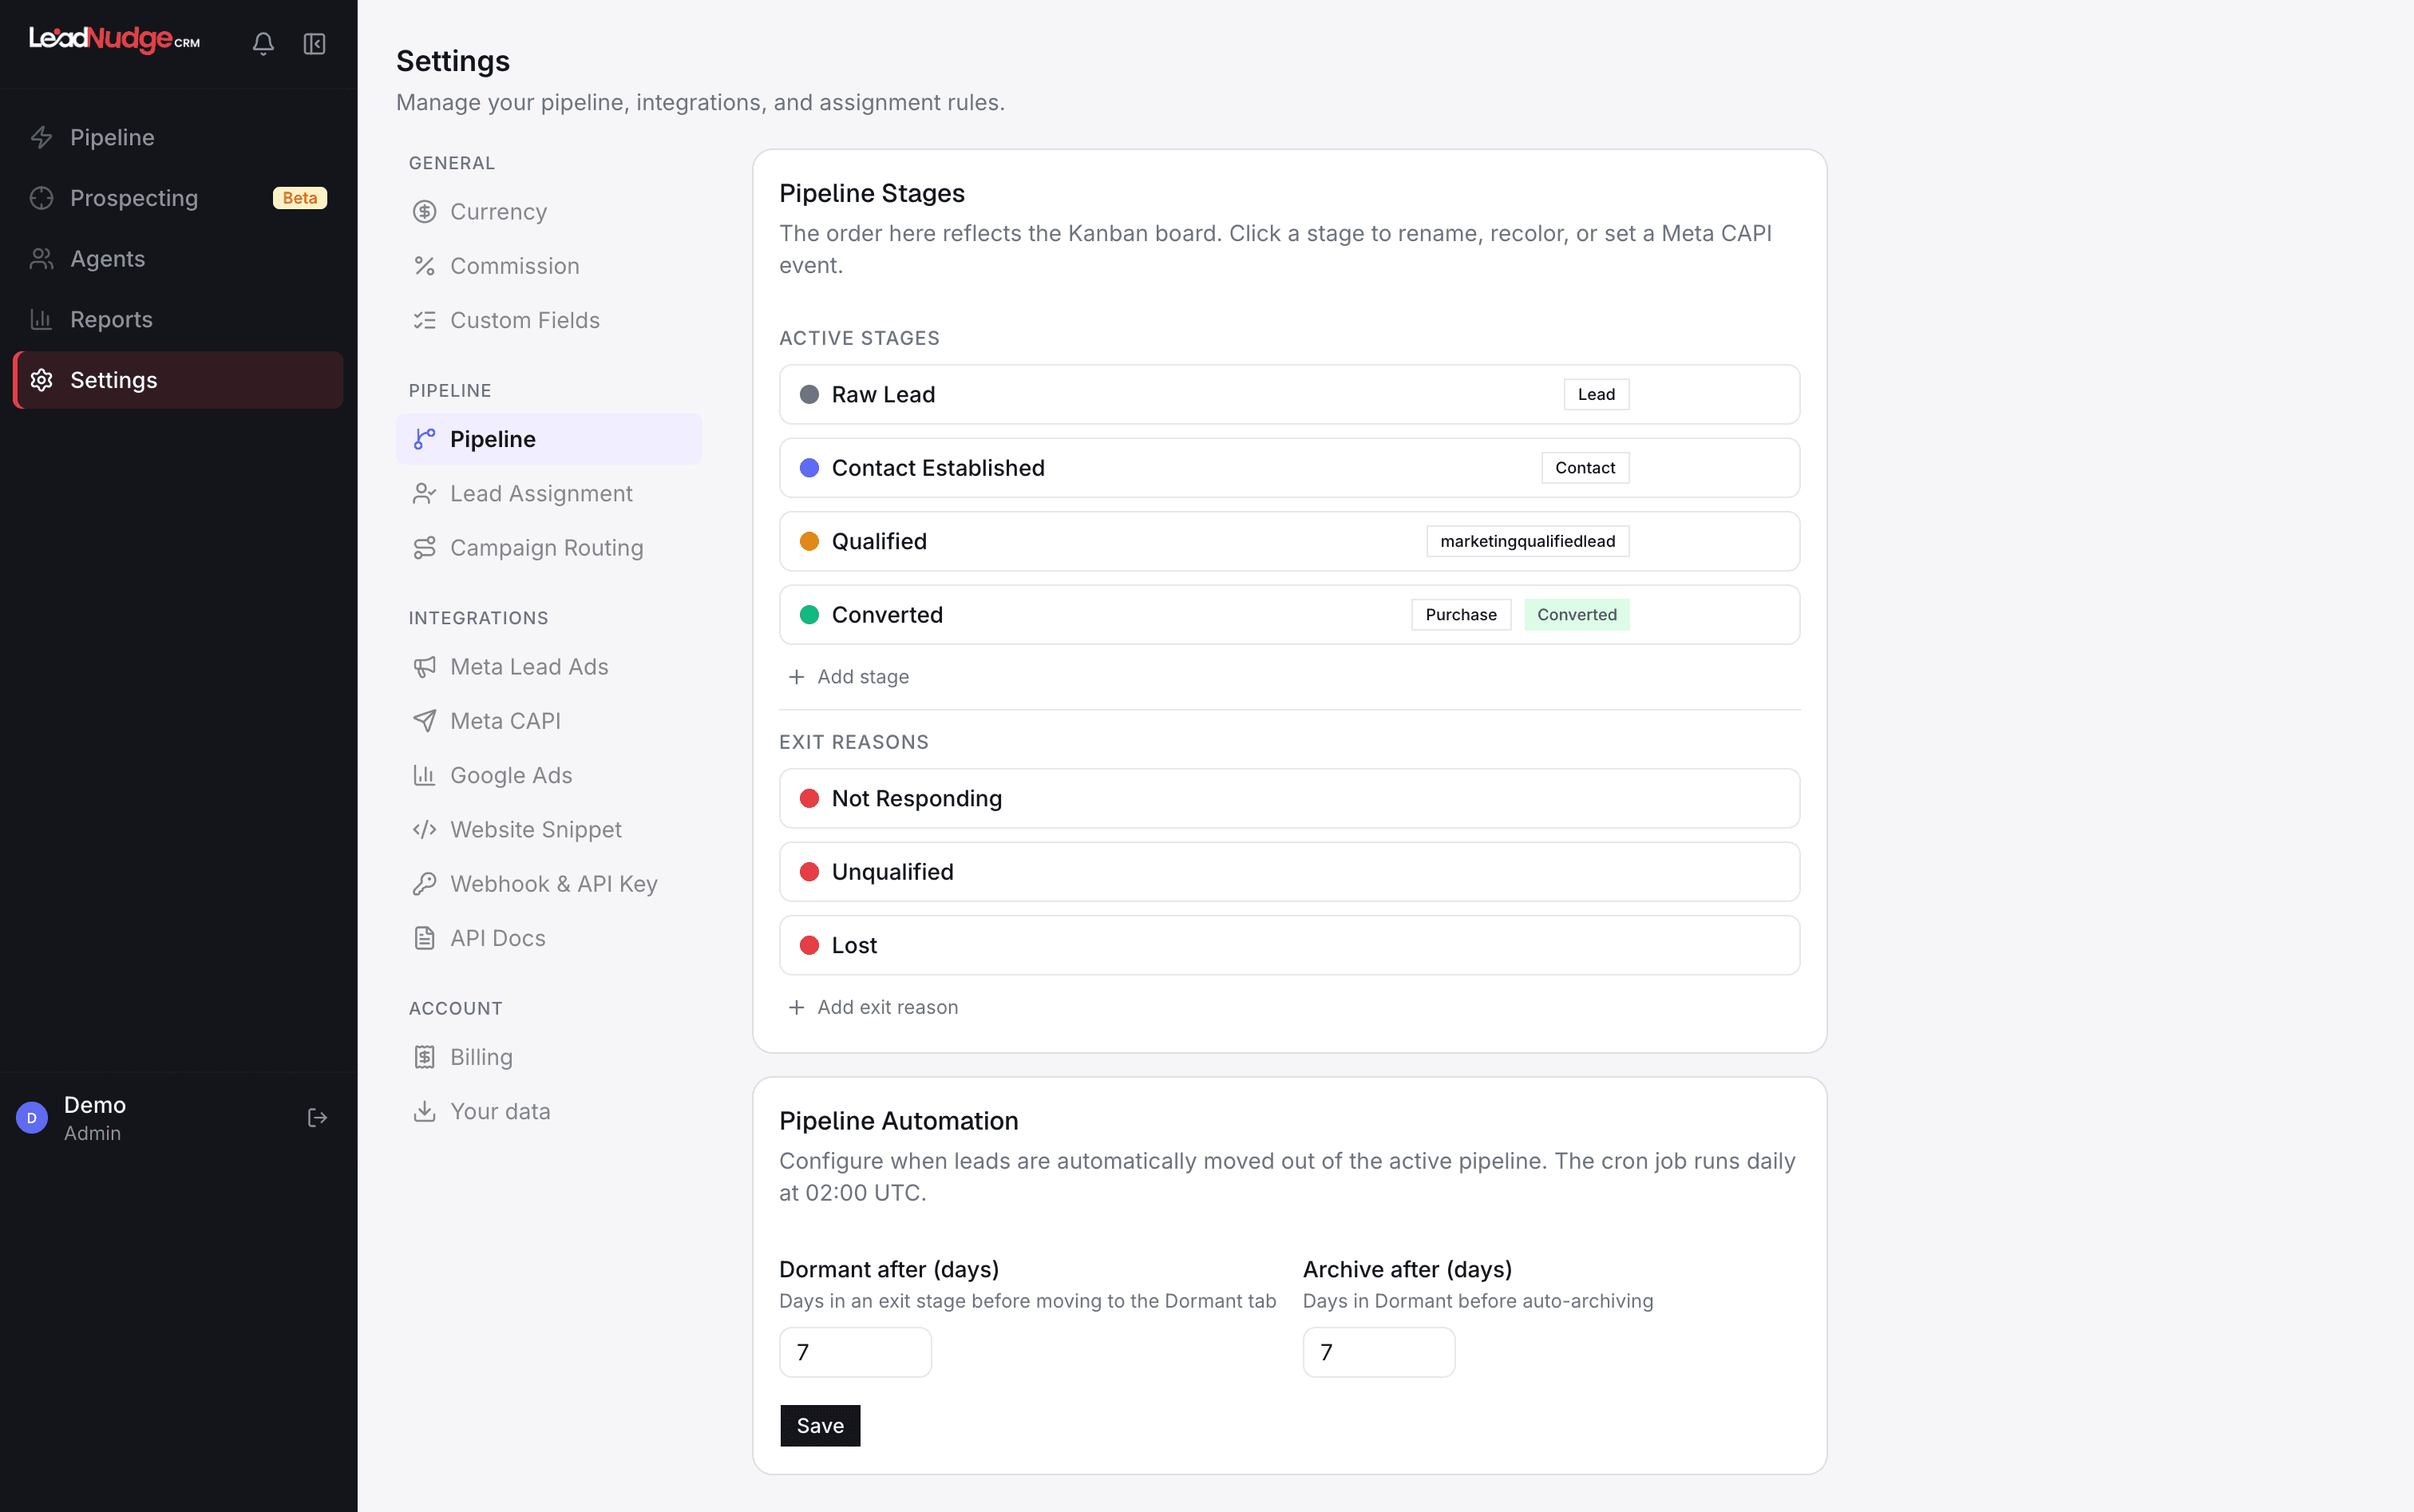
Settings (/settings) is organised into four groups. Admin access only. Each group has dedicated tabs — navigate using the left sidebar within the Settings page.
- General: Currency (default deal value currency), Commission (global commission rules), Custom Fields (add fields to lead profiles)
- Pipeline: Pipeline (configure stages, SLA thresholds, Meta events, Google conversion actions), Lead Assignment (round-robin or manual rules), Campaign Routing (route specific ad campaigns to specific agents or stages)
- Integrations: Meta Lead Ads, Meta CAPI, Google Ads, Website Snippet (JS embed code for your website forms), Webhook & API Key, API Docs
- Account: Billing, Your Data (export or delete your workspace data)
- Dormant After (days) and Archive After (days) are configured in Settings → Pipeline — these control when leads move from Active to Dormant and from Dormant to Archive
Importing Leads (CSV)
Import an existing lead list from the Pipeline page. Go to the Active tab and click the "Import" button (visible to admins). A four-step wizard guides you through upload, column mapping, preview, and import.
- Step 1: Upload your CSV file
- Step 2: Map CSV columns to LeadNudge fields — auto-detects common headers like "First Name", "Email", "Phone"
- Step 3: Preview a sample of rows with mapped values before committing
- Step 4: Result summary shows how many leads were created, skipped (duplicates), or errored
- Supported fields include: name, email, phone, deal value, campaign/ad/UTM data, custom fields
- Imported leads are tagged with source "csv_import" and follow the same pipeline and SLA rules as any other lead
FAQ
Common questions
How long does the initial setup take?
Most teams are fully live within a single working day. Connecting Meta (Settings → Meta Lead Ads) takes about 5 minutes. Configuring pipeline stages (Settings → Pipeline) takes another 10–15 minutes. Inviting agents from the Agents page takes under 5 minutes per person.
Do I need technical knowledge to connect Meta?
No. The Meta connection is a standard OAuth flow — the same experience as "Login with Facebook" on any app. You select your Page and click Authorise. No API keys or developer portal access is required.
Where do I add team members — Settings or Agents?
Agents. Go to the Agents page (/agents) and click "Invite Member". There is no team management section in Settings.
Can I change pipeline stages after leads are already in them?
Yes. Renaming or reordering stages in Settings → Pipeline does not move existing leads. Leads stay in their current stage — only the label and position change. To delete a stage, you must first move or archive leads in that stage.
What happens to leads that come in before I finish setup?
You won't miss them. The Meta webhook activates the moment your Page is connected. Leads that arrived before the connection are not backfilled automatically — use "Sync Historical Leads" in Settings → Meta Lead Ads to import them manually.
Where can I get help if I'm stuck?
Email us at info@leadnudge.ae or reach us on WhatsApp. We typically respond within a few hours during UAE business hours.
Ready to get started?
LeadNudge comes with a 10-day free trial. No credit card required. Most teams are fully live within a day.